How to Get Google AdSense Approval: Real Tips That Work (2024)
Getting your website approved for Google AdSense can feel like a huge challenge. Many bloggers and website owners apply multiple times before finally getting accepted. The good news? If you follow the right steps, you can increase your chances of approval without wasting time.
I’ve helped dozens of websites get AdSense approval, and in this guide, I’ll share exactly what works—based on real experience, not just theory.
Why Do Most AdSense Applications Get Rejected?
Before we dive into the approval tips, let’s understand why Google rejects so many applications:
✅ Not Enough Content – If your site has only 5-10 posts, chances of rejection are high.
✅ Copied or Low-Quality Content – Google hates duplicate or poorly written articles.
✅ Bad Website Structure – Broken links, slow loading speed, or no essential pages (like Privacy Policy).
✅ Wrong Niche – Some topics (like gambling, adult content, or hacking) are banned.
✅ No Real Traffic – Sites with zero visitors often get rejected.
Now, let’s fix these issues one by one.
1. Publish Enough High-Quality Content
How Many Posts Do You Need?
- Minimum 25-30 posts (some get approved with 15, but 30 is safer).
- Each post should be 800+ words (longer, detailed posts perform better).
- No AI-generated content (Google detects it, and manual reviewers reject it).
What Kind of Content Works Best?
- Beginner-friendly guides (Example: “How to Start a Blog in 2024”)
- Problem-solving articles (Example: “Why Is My AdSense Application Rejected?”)
- List posts (Example: “10 Best SEO Tools for New Bloggers”)
- Tutorials with step-by-step instructions
Pro Tip: Before applying, check your content with Grammarly & Copyscape to ensure it’s original and error-free.
2. Make Sure Your Website Looks Professional
A. Must-Have Pages for AdSense Approval
Google wants to see a complete, trustworthy website. You MUST have:
✔ About Us Page (Who you are & why you run this site)
✔ Contact Page (Email or contact form)
✔ Privacy Policy Page (Required by law & AdSense)
✔ Disclaimer Page (If using affiliate links)
B. Website Design & Speed Matter
- Use a clean, fast-loading theme (avoid cluttered designs).
- Mobile-friendly (over 60% of users browse on phones).
- No annoying pop-ups (they hurt user experience).
Test your site speed for free: Google PageSpeed Insights
3. Avoid These Common Mistakes That Get Sites Rejected
🚫 Copy-Pasted Content – Even 10% plagiarism can get you banned.
🚫 Too Many Ads Before Approval – Don’t use other ad networks before AdSense.
🚫 Broken Links & 404 Errors – Fix them before applying.
🚫 No Traffic or Fake Traffic – Buying clicks will get you banned forever.
4. Get Some Real Traffic Before Applying
Google prefers websites that already have visitors.
- Aim for at least 50-100 daily visitors (check in Google Analytics).
- Promote your posts on Pinterest, Facebook Groups, and forums.
- Use basic SEO (keyword research, internal linking) to rank on Google.
Warning: Never buy fake traffic—Google will detect it and ban your site.
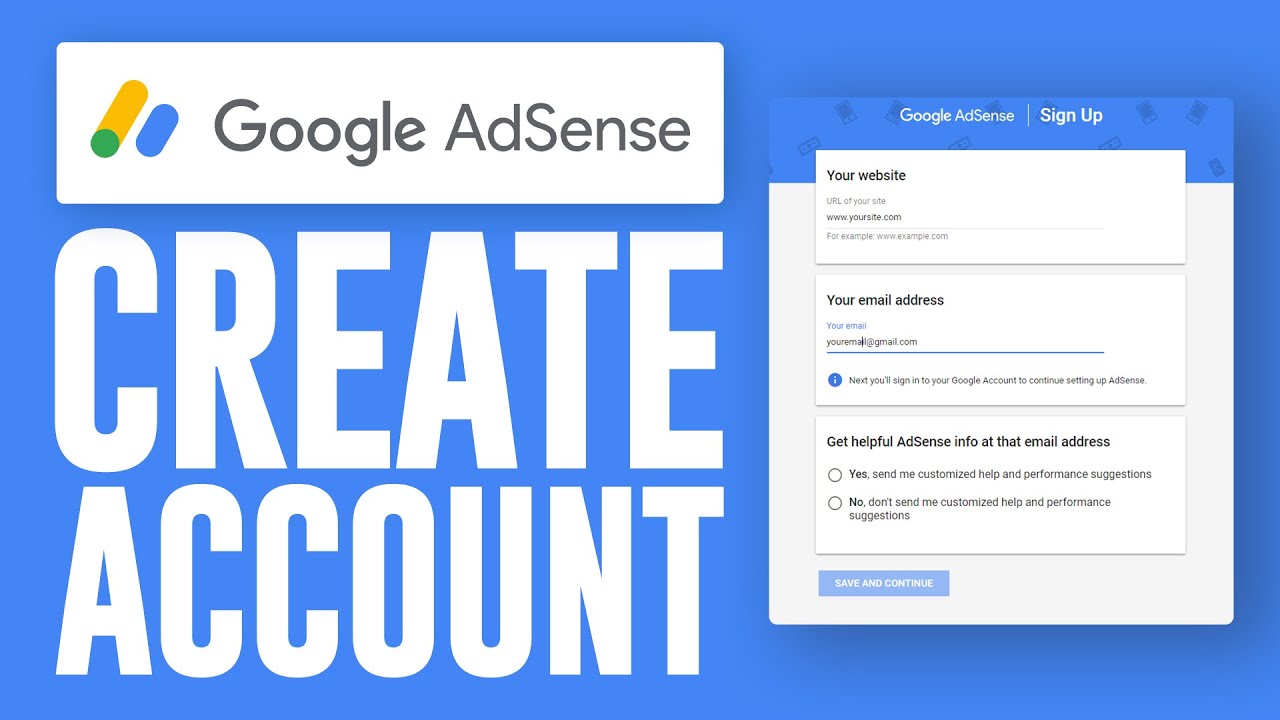
5. How to Apply for AdSense (Step-by-Step)
Once your site is ready:
- Go to adsense.google.com
- Click “Start Now” and enter your site URL
- Submit and wait 3-7 days (sometimes longer)
- Check email for approval or rejection
What If You Get Rejected?
- Read Google’s reason (they usually tell you why).
- Fix the issues (add more content, improve site speed, etc.).
- Wait 2 weeks and reapply.
Bonus: 3 Insider Tricks to Speed Up Approval
🔥 Use a Custom Domain (Avoid free sites like Blogger or WordPress.com).
🔥 Publish 2-3 New Posts Before Applying (Shows your site is active).
🔥 Interlink Your Articles (Helps Google crawl your site better).
Final Advice: Be Patient & Keep Improving
AdSense approval isn’t instant. Some sites get approved in 3 days, others take weeks. If rejected, don’t give up—just fix the issues and try again.
Once approved, focus on driving more traffic and optimizing ad placements to maximize earnings.